The How-To Guide
How-To Guide Page Contents
(These subsections are split by divider lines. You can also hit Ctrl-F to Find a subsection even faster!)
* Setting Up StepMania Did you just install SM? Here's how to get everything all set up.
* Synchronization: How to ensure your arrow-to-music synchronization is good so accurate play is rewarded as it should be.
* Beginners: How to Read Difficulty Levels How to set your difficulty level, and how to recognize other signs of difficulty.
* Beginners: About Arrow Types and Colors What all those colors and tails mean.
* Beginners: Timing Your Steps A guide on how to time your steps and how to tell if you're doing alright or not.
* Intermediate: Picking a Speed Mod For those having trouble, info on how they work, and advice on how to pick one.
* Intermediate: The Combo Counter Information regarding how the combo counter works.
* USB Card Guide How to set up a USB card for use with an ITG machine.
* How to Create Your Own Simfile From Scratch Info on how to create your own simfile!!
Setting Up StepMania
When you install and boot up StepMania for the first time, the options are set up for a traditional 3-song game (and the theme will be default, too, even if you downloaded one from the StepMania section), so a lot of the options are not set the way a typical player would have them; thus, here's a list of stuff you'll want to change as soon as possible, and where to go to do it.
Head into the Option menu, where you'll find all sorts of ways to tweak stuff. Here's what you'll wanna do:
1) Turn on Event Mode.
[This does not need done if you got a Starter Bundle.]
Go into the Coin Options, and turn on Event Mode. (This will allow you to play forever until you choose to quit by hitting [Esc] to go back to the main menu; if you don't do this, a "set" will consist of 3 to 4 songs, then you'll be taken back to the title menu.)
2) Turn off the menu timers.
[This does not need done if you got a Starter Bundle.]
Go into the Machine Options, and turn off the Menu Timers. (You're at home - there's no need for them. :p)
3) Whenever you install a new Theme, switch over to it.
Assuming your Theme is properly installed (see the Theme subsection for details), you can go into the Appearance Options menu to switch over to it. (You can also set which Noteskin is your default in this menu, which you'll need to change to Metal or Cel if you downloaded and installed the Noteskin Pack I offer below.)
4) If you don't like the arrow keys, take a moment to configure your controls.
More or less obviously, this is done in the Config Key/Joy area. The 3 columns on the left side are Player 1's controls, the columns on the right are Player 2's controls (column 3 for each side is the default controls, which you cannot change directly, though those keys can be re-assigned elsewhere). Navigate to a button you'd like to change the setting for (or highlight an empty space to add a new one), hit [Enter] to tell it you want to change that one, then hit the key you'd like to use. Do this for all keys you'd like to change.
5) If you want your name displayed onscreen for high score screenshots, take a moment to create a profile.
Do this in the Profile Options. Create one (your name can be up to 12 characters long, and you can use any letters, numbers, spaces, or symbols you want), then make sure you switch to it to tell SM which profile Player 1 will be using. Your name will then be displayed in the lower-left corner while playing.
6) If things aren't sized right, take a moment to set your graphic options.
The Graphic Options menu is there for a reason - all imaginable options are in there, from screen aspect ratios for those who have widescreen monitors to resolution and quality options. So if things don't look right, go in there and change anything necessary.
Synchronization
|
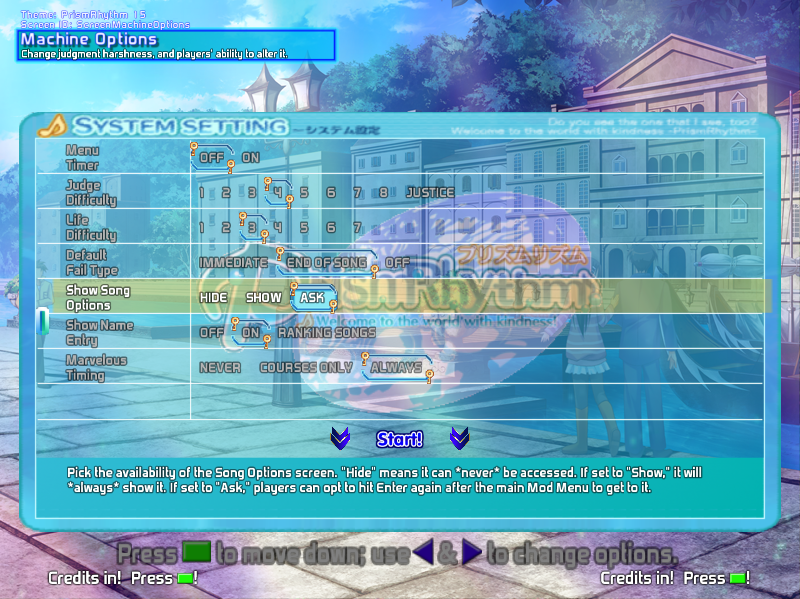
Step 2. I like to set the song options to "Ask," but you can use "Show."
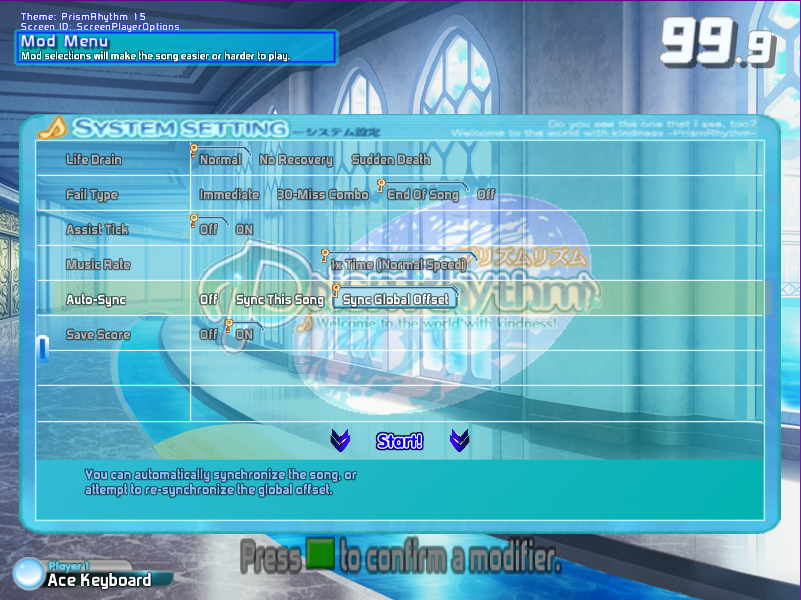
Step 5. This is the second mod menu you enabled, which shows options you normally shouldn't need to mess with for normal play - the menu you want, because the auto-sync options are in here. You want "Sync Global Offset" (some themes call this "Sync Machine," it's the same thing).
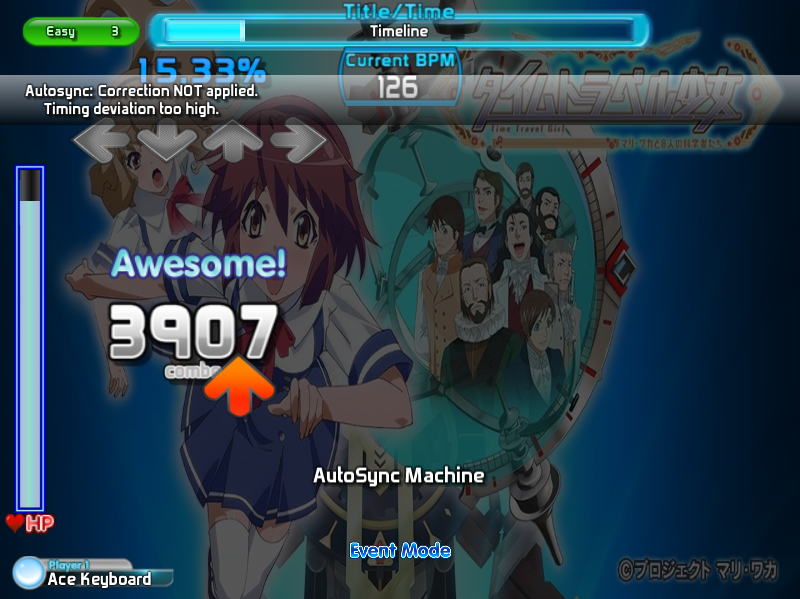
Step 7. You'll see system messages at the top to let you know if you've successfully changed the GO or not; in this case, the game is letting me know my timing isn't consistent enough to determine a change to make ("timing deviation too high"). What you want is for it to say the GO has been changed.
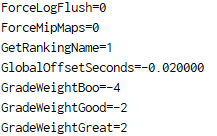
The actual global offset value can easily be found and edited in StepMania.ini. You want the GlobalOffsetSeconds= line.
|
These days, any rhythm game worth its salt - even console-based ones - will allow you to check and change your object-to-music synchronization. StepMania is no different, although StepMania 3.95 does not have a special synchronization screen the way StepMania 5 or other rhythm games do. Either way: Your copy of StepMania is probably not perfectly-synced for your tech device setup: slower and faster computers may require different sync, and different audio devices can require very different sync (wearing headphones, for example, is going to be synced very differently from if you play on a surround-sound system).
Thus, there is a value called the global offset (GO) that you can adjust. On any copy of StepMania, this starts at +/- 0 seconds, and more importantly, exactly 0 is almost never right for your device setup, so you will want to take a few minutes to synchronize the GO to ensure that when you do hit arrows with correct accuracy, you will actually get the high judgments you should get for it. Good synchronization is VERY important! If you do not have reasonably good sync, you will hit arrows when you should, but you won't get the highest judgments for doing well, and it will frustrate you! Here is how you can sync StepMania to your play-device/audio-device setup on StepMania 3.95. Synchronizing In-Game (Recommended to Try First) 1) From the main menu, go into the Operator Menu ("Options") and select "Machine Options." 2) Scroll down to the Show Song Options line, and either turn it On or tell it to Ask. (That menu will be where your sync options are in a bit.) You can back out of the operator menu now. 3) Start a credit as per normal by picking Dance Mode. 4) Choose a song and go into the mod menu. Preferably you want a song that you know has fantastic sync as a song (songs can also have bad sync, so it wouldn't be any good to sync your GO using a song that has crappy individual sync!) - I like to use "Love is Real" from my 16th pack. You should also synchronize on a low difficulty so you can be consistent with your timing - when syncing GO, it is way more important that you can get good judgments consistently than to play on a high difficulty. 5) After confirming the normal mod menu, either the second one will show up automatically (if you set it to "Show") or the game will prompt you to press your Confirm button again (if you set it to "Ask"). You do want to go to the second mod menu. 6) On this mod menu, scroll down to the Auto-Sync line and pick "Sync Global Offset." 7) Play the song. Ignore how the arrows appear to be synced (since your starting sync is probably not right anyway), and just hit notes when you know you SHOULD be hitting them. You will occasionally get messages throughout the song saying if the GO has changed - and if it has, it applies it immediately so you can feel the difference. By the end of the song, you should be hitting mostly high judgments if the GO was adjusted properly and your accuracy is good - that is how you know your GO has been synchronized correctly. 8) At the end of the song, before the results screen, you'll get a black screen saying that you changed the GO from (old value) to (new value), and asks if you're okay with keeping that change. Assuming you did reasonably well with it, you probably should say yes. At this point, you can go into that menu again, turn auto-sync Off (do remember to do that, or it'll stay on!), and back out to the main menu to turn off being able to see that mod menu again. You're done! Editing the Global Offset Manually (Recommended for Fine-Tuning) StepMania 3.95 uses a document in StepMania CVS/Data called StepMania.ini. This is a plain-text document that houses all the important settings. If you need to fine-tune or just aren't good with the live synchronization, you can edit the GlobalOffsetSeconds= line to change the GO. This is annoying to do, since you can't edit it with the game open, so every time you change and save it, you have to re-open the game to check if it feels right again. However, this works really well for fine-tuning your sync if you think you've got it close and don't want to risk screwing it up badly by performing another live-sync. I recommend fine-tuning by hundredths of a second (+/- 0.01) at a time; there isn't much need to go to thousandths or deeper. |
Beginners: How to Read Difficulty Levels
How to Read Difficulty Levels
Difficulty is determined two different ways: by generalized named level, and by number rating.
1. Names
There are five general levels of difficulty you can choose from.
From easiest to hardest, using ITG terminology, they are Novice, Easy, Medium, Hard, and Expert.
(The default StepMania theme uses DDR terminology, calling them Beginner, Light, Standard, Heavy, and Challenge.)
2. Numbers
In addition to recognizing a song's stepcharts by a named difficulty level, each is also given a numerical rating on a general scale of 1 to 10. If you're playing on Easy or above, taking a moment to check the song's number difficulty for whatever difficulty you're on is critically important, as songs' number difficulties vary, even within the same difficulty level.
That being said, though, named difficulty levels do generally fall within a particular numerical range (though some particularly hard songs tend to go a bit over, as noted), as follows:
Novice: Most songs on Novice are rated 1 or 2 (though particularly hard songs will sometimes yield a 3).
Easy: Most songs on Easy range from 2 to 4 (difficult songs may be a 5 or even a 6).
Medium: The majority of Medium songs range from 4 to 6 (with a few 7s, 8s or rarely 9s here and there).
Hard: Songs on Hard are mostly 7s and 8s (though there are a notable number of 9s, and rarely 10s or even 11s).
Expert: Expert difficulty is generally comprised of songs rated 9 to 11 (with some 12s, 13s, and in normal packs, rarely 14+s).
Changing Your Difficulty Setting
There are 2 places you can change your difficulty setting.
1) On the Song Select screen, you can change your difficulty by double-tapping the Up arrow on the stage for an easier difficulty, or double-tap Down to make things harder.)
2) You also get a chance to change your difficulty on the Mod Menu; it's on the very last line.
Safety Nets by Difficulty
Novice players get to play all 3 songs in their credit, regardless of whether they pass any of them or not.
Easy players are guaranteed their second song even if they fail their first (but fail the second or third, and it's game over).
Medium and above have no safety net - fail any song and the game is over.
Beginners: About Arrow Types and Colors
Now that you know how to get to the gameplay screen and reassure yourself of your difficulty setting, I imagine you want to know how to play, so this section naturally follows from the one before. Before we talk about timing, though, let's take a moment to get to know our arrows. You gotta know what they look like so you'll know how to hit them, yes?
Arrow Types
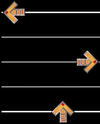
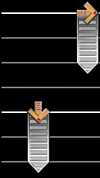
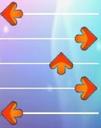
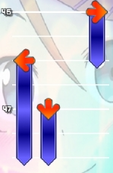
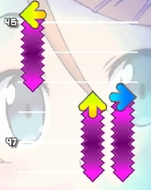
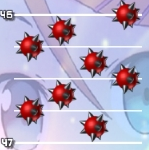
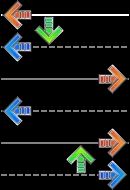
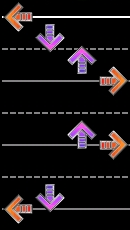
How you perform an arrow depends on whether it has a tail or not, and what kind of tail. Here's how arrows work. Don't worry: you won't have to worry about all of these types right away; you'll generally start with some Tap arrows (and maybe some Holds) on Novice, and discover the other types gradually as you work your way up. (Screenshots are from the editor; you won't see any measure lines during gameplay).
|
Taps Basic, ordinary arrows, seen on every difficulty; Novice tends to consist mostly of this type. They come up and cross the targets, and you hit them. Nothing incredibly special, other than, if two of them come up at the same time, you Jump and hit both. Holds Pretty common on Easy and up. Holds are a type of arrow that has a "tail." Holds have smooth tails. When you see a Hold, you press the arrow when the hold's "head" crosses the targets (like you would with a Tap), and you must keep holding that arrow for the entire length of its tail. If you don't, you'll drop your hold, and it will count against you. Rolls These start becoming commonplace in some simfiles as soon as Medium, though some Easy and Novice charts have them. Rolls are also a "tail" type: they have spiky tails. To perform these, you're expected to repeatedly tap whichever arrow(s) the roll is on for the entire length of the tail(s). If you don't, you'll drop it, and it'll count against you. Do not treat a Roll like a Hold; trying to just hold it down will also count against you (the game will know if you aren't tapping it repeatedly). Mines Mines are traditionally only seen on Hard and Expert on songs that have any, and are mercifully rare on easier settings. These are the only thing you want to avoid; if your foot is on that panel when a mine crosses the targets, it explodes, which has two effects: it reduces your life gauge, and penalizes your score! Be particularly wary on Expert of songs that have minefields, lest your game come to a premature conclusion. |
Arrow Colors
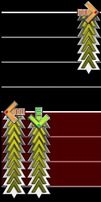
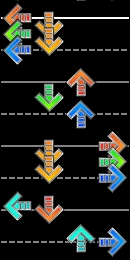
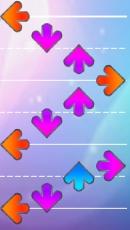
The arrows aren't colored to be pretty; what color arrows are is actually really important - they're colored to match their timing in relation to the beat of the song. Just like arrow types, you'll start with one color, and start seeing more as you go up in difficulty level. To help you understand the timing, the screenshots are from the editor; the solid lines are the main beat (4th note lines), the dotted lines are the downbeat (8th note lines).
|
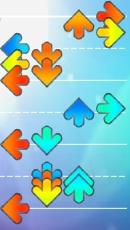
Red arrows (1/4 notes) fall directly on the main beat of the song; this is the largest denomination of notes. These are common in all songs, and you'll find them on all five difficulty levels; Novice consists almost entirely of red arrows. Blue arrows (1/8 notes) fall exactly mid-way between red arrows, falling on the "downbeat" of the song. These start appearing around the time you get to playing 4s on Easy. Yellow arrows (1/16 notes) fall exactly mid-way between a red and a blue arrow. You won't start seeing these until you start playing some difficult 7s (probably on Hard), but these are very commonplace on Expert, as they are good for following some basic melodic complexities. Purple arrows (1/12 and 1/24 notes) only appear in songs or segments that have a 3/4 time signature, which makes them unique among arrow timings, as they don't fall within the typical 4/4 conventions. Songs with such time signatures generally start introducing limited numbers of 12th-note purple arrows around Medium difficulty, which is generally a 6 or 7 in such songs. Orange arrows (1/32 notes) are what seasoned players call "trill" notes (which is worse than 24th "drumming"); these are twice as fast as yellow 16ths. These typically only appear during slowdown sections (in which case, they are played as though they are 16ths), but can appear at regular-BPM speeds in short trills on occasion, generally in Expert songs rated 11 or higher. Cyan arrows (1/64 notes) are the epitomy of accuracy, and are seldom ever seen outside of 12+ difficulty slowdowns. These fall mid-way between oranges. A very few ska-genre songs (or songs with ska-like rhythm) use kinda gallop-like patterns that utilize 64ths instead of 16ths at normal BPM, but typically, they are seen only in ridiculously hard slowdowns on extremely difficult Expert-level songs (played as though they are 32nd notes in that case). |
Beginners: Timing Your Steps
How to Time Your Steps
|
I cannot possibly stress this enough. You want the best judgments, you do this. There's no better way to explain it.
|
Watch as the arrows come up the screen, and listen to the music (not listening to the music is the #1 reason why newbies fail to get even halfway-decent judgments).
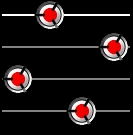
You want to tap the arrow on beat with the song, which happens the millisecond the arrow completely overlaps the gray targets like you see in the screenshot to the left. Not a moment before, not a moment after. |
How to Tell How Good Your Timing Is
There're several ways to tell how well you're doing.
Timing Judgements
Every single time you hit an arrow (including jumps and handplants), each hit is individually judged based on when you actually stepped, versus when you were supposed to step. There are several step accuracy judgements, which basically all mean the same thing regardless of which theme you're using.
These are the timing levels, listed from most accurate at the top to least accurate at the bottom.
About Magnificent/Ridiculous:
* Ridiculous timing used to have a patch to put it in the old StepMania 3.9 release while keeping all other judgment levels.
* To use Magnificent timing for 3.95, just download the Adept build of my PrismRhythm theme. It adds that timing level at the cost of getting rid of Awfuls (it also tightens less-accurate timing windows as well, as you can see below).
You can also check here to see how timing windows compare.
|
Dance Dance Revolution
Strictest accurate judgments. Ridiculous 0.008 Marvelous 0.016 Perfect 0.033 Great 0.091 Good Old: 0.141; Modern: 0.120 Boo Old: 0.225; Modern: 0.150 Miss |
PrismRhythm
Strives to be fair and use nice round numbers. Magnificent (Was in Adept Build): 0.010 Awesome 0.020 Sweet 0.040 Nice 0.080 Shaky 0.120 Awful 0.160 Miss |
In The Groove
Loosest in general, huge Great window. (ITG doesn't use this judgment level.) Fantastic 0.0215 Excellent 0.0430 Great 0.1020 Decent 0.1350 Way Off 0.1800 Miss |
Early/Late Indicator
In ITG (these are also featured in my PrismRhythm theme), every judgment level other than the highest comes with an indicator of some sort that tells you whether you were off by being early or by being late. ITG uses a hypen to indicate timing (for example, if you see "-Excellent", it means you stepped a little early, "Great-" means you stepped pretty late), whereas my PrismRhythm themes will actively indicate "<- Early" and "Late ->" to be a bit more clear.
Life Gauge
Your life gauge starts at the halfway mark at the beginning of any song; scoring better than a Decent grants you some health, scoring worse than a Decent will hurt you. If there's anything left on the gauge at the end of the song, you pass (it doesn't have to be full).
An Extra Note
So you know: You don't have to return your feet to the center metal plate after every single step; you won't get penalized for idly standing on arrow panels while waiting for more arrows to come up the screen. (Well, not unless a Mine shows up, anyway.)
Intermediate: Picking A Speed Mod
There's just no contest: The mod you will be changing most often will, by far, be your Speed mod; it's the #1 reason for visiting the Mod Menu (actually, once you figure out which Perspective and Noteskin you prefer, it will probably eventually become your only reason - unless you like crazy mods like Tornado or Flip?).
Your Speed mod determines how fast the arrows will travel toward the targets at the top of the screen, and is based, in part, off the BPM (beats per minute) of the song itself. It's hard enough to pick regular numbers (like 1.5x or 3x), but at the arcade (and in my ITG themes) there are also C-mods and M-mods for more knowledgeable players to pick from too!
All this can be confusing, but as always, I'm here to help clear things up. For those who want to know beforehand, or are having trouble figuring things out, here's all the info you'll need. ^.^
|
How Picking a Speed Mod Works Note Your Difficulty Level and the Song's BPM
First of all, you want to note which difficulty you're playing on (newbies will inevitably read slower speeds than experts), and how fast the song's BPM is. I'd say around 160-170 BPM (the usual speed for most songs) will determine your "usual Speed mod," though faster songs 180 BPM+ may require you to step it down a tad. (You can check a song's BPM under the song's banner on the Song Select screen, and ITG themes will also display it on the Speed line of the Mod Menu.) Of course, everyone reads at different speeds, and how quickly you become able to read faster speeds varies; once you know what suits you, you can (and should) pick whatever you're comfortable with. However, for those who are unsure, here are my suggestions for general guidelines: Novice If you're playing Novice on an ITG theme or arcade cabinet, you have no choice as to your speed mod: the game will force C120 on you to simplify the speed of the arrow stream (see the section on the right for what that means). If you wanna change your mod, you MUST move up in difficulty to at least Easy. If you're playing SM using the default theme, then you can choose, and should pick 1x (or 1.5x if 1x is too slow; I'd say 1.25x, but the default theme doesn't offer it). Easy Usual Speed Mod: You should probably stick with the default of 1.5x; this is generally pretty readable for newbies. You can move up to 1.75x or 2x if that's too slow, or down to 1.25x if it's too fast. Fast Songs: If the song's BPM is fast, say 180 or up, you will probably want to go with 1.25x or even 1x. Medium Usual Speed Mod: By now, you'll probably be capable of or even comfortable with reading 1.75x or 2x for most of the songs you'll play. Fast Songs: Go back down to 1.5x (or 1.75x if you normally read at 2x). Hard Usual Speed Mod: You should have a good idea what you're comfortable with by now, but if you still want a suggestion, I'd say around 2.5x should be a comfortable reading speed. Fast Songs: You may be able to still read 2.5x up to about 180 BPM, but if it's much higher than that, consider decreasing by 0.25x or 0.5x under whatever you usually use. Expert Usual Speed Mod: By the time you start passing 9s on a regular basis, you should be reading nearly everything at either 2.75x or a full 3x (though there's nothing wrong with faster if you're capable, and many people who pass 11s or more can and do read at 3.25x, 3.5x, or even higher). There's also nothing wrong with coming up with a system for determining what speed mod you're comfortable with depending on the BPM of the song. Fast Songs: As with my Hard suggestions, decrease your speed mod by 0.25x or 0.5x under whatever you usually use. Special Case: Mini Some skilled ITG players make the arrows smaller (on the Size line of the Mod Menu) so they can see more of the arrow stream onscreen at a time. If you decide to use Mini, you should increase your speed mod over whatever you normally use, to compensate for the smaller arrow size; at 60% Mini (the traditional size for the Mini mod), I recommend the following change ranges (depending how fast you normally read): Easy: 0.75x to 1.25x over your normal speed. Medium: 1.25x to 1.75x over your normal speed. Hard: 1.75x to 2.5x over your normal speed. Expert: 2.5x to 3.25x over your normal speed. Special Case: 300+ BPM Songs If you're playing "Energizer" or "Pandemonium" (ITG2), or anything from the "Max" series (DDR; like "Max 300" or "Maxx Unlimited"), the BPM will be ridiculously high, 300 BPM or more. This requires players of all levels to decrease their speed mod. Easy: Go with 1x. Medium: The same; 1x. Hard: Try out 1.25x; if you can't read that, 1x. Expert: You should be able to do 1.5x; if not, 1.25x. |
What Each Speed Mod Type Means X-Mods
(Multiply Spacing) These are your usual speed mods. Dependent upon the speed of the song in BPM, the arrows travel up the screen at a particular pace, normal speed, of course, being 1x; the faster the song is, the faster the arrows go in the first place. (So you know, the reason ITG's default is 1.5x is because even most newbies complain that 1x is just plain way too slow, though you can, of course, set it back to that if you disagree.) These traditional speed mods simply alter how spread-out the arrows are (and therefore how fast they will travel up the screen). In this way, those who cannot "read" slower arrow streams (because they are too cramped) will find reading a faster speed mod to be easier. Players will naturally gain the ability to read faster speeds as they move up in difficulty (and as they discover more complicated steps, will want to move up in speed, so they can read the harder steps more easily). C-Mods ("Constant") C-mods force the entire arrow stream to travel at that BPM regardless of the original arrow speed of the song. This eliminates all speed changes and/or tempo stops in a song (and therefore disqualifies a high score on ITG themes). ITG themes force Novice players to play at C120 (which, if you're wondering, is very slow) so they don't have to deal with slowdowns, speedups, or tempo stops which may otherwise be present in the song. You should use a C-mod when you know a song has BPM changes or stops that you are not yet entirely familiar with; this way, you can better-determine how the speed changes or stops should be played when you play the song again with a normal speed mod. M-Mods ("Make") M-mods, first of all, aren't available in StepMania 3.95; they only work on OpenITG and StepMania 5. But anyway, these are for knowledgeable players who like to calculate what their "reading speed" is so they can associate a raw number with the speed they're comfortable with reading at. Keep in mind that M-mods are only available in StepMania 5 and OpenITG - even if your graphical theme has them listed, they won't work in any other environment (so 3.95 users are out of luck on this one). The formula for calculating your reading speed is: (Song BPM) x (Speed mod you'd normally use for it). (Example: I am capable of reading 160 BPM songs at 3.6x. 160 x 3.6 = 576, so my reading speed is around 576, and thus I'd use M-mods close to that, such as M580 if it exists, or M550.) If you know what your reading speed is, then you can use M-mods to guarantee the arrows will scroll at a speed you're comfortable with reading at. M-mods do not eliminate speed changes or tempo stops; those song elements will still proceed as per normal (thus, as I recall, M-mods do not disqualify for high scores). So in the end, M-mods are for those who know their level of comfortability, but are indecisive on regular mods; so if you can't decide between, for example, 2.5x and 2.75x, then perhaps it would be better to eliminate the indecision and go with an M-mod. How to Get to C/M-Mods To get to the lists of C- and M-mods, simply keep scrolling right, through the list of x-mods, past the entry for 10x; the C-mod list is found after it, starting with C120. The M-mod list is found past the entry for C1000, then the list loops back to the start (0.5x) after scrolling past M1000. |
Intermediate: The Combo Counter
Many people are intrigued by the combo counter and are impressed when a player attains a big one, or if it starts glowing different colors. Though this information is not vital to passing a song, I've decided to include it anyway, both so you know, and just in case you care about keeping your combo alive.
How Combos Work
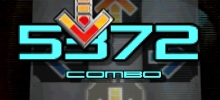
Any step given a judgement of Fantastic, Excellent, or Great (accurate judgements) will add to your combo and keep it alive. Getting a Decent or worse (being significantly inaccurate) will kill your combo. (Contrary to what you might think, hitting a mine on higher difficulties will not kill your combo.)
Your combo, as long as you can hold it, will keep increasing song-to-song. If you aren't using a profile, then it will stop at the conclusion of your set. However, if you're using a profile (on a real machine, your profile would be on your USB card; on StepMania, you can easily make one from the menu), it will just keep climbing until you lose it. (This may make you ask "is 10,000 possible?", to which the answer is yes, the counter will count that high without any difficulty, and yes, it's been done many times by various players, myself included).
Combo Glow
Skilled players able to consistently get good judgements on ITG may be rewarded by having the combo counter glow. This is an important thing to note if it happens, so here's how you know what's going on. (If you are using a StepMania 5 alpha build, or any DDR-based theme, your combo won't glow no matter how well you do.)
|
A Green Combo, as seen in the ITG2: Velocity theme.
A Gold Combo, as seen in the ITG2: Velocity theme. A Blue Combo, as seen in the ITG2: Velocity theme. |
Green Combo
If the combo counter is glowing green, the player has received only Great, Excellent, and Fantastic judgments for the steps played so far (no judgments Decent or worse). Finishing a song with a combo glowing this color is a Full Combo. Full Combos usually receive a grade somewhere between an S- and a single Star (though it can be less). Getting a Decent during a Green Combo kills the combo entirely, so this is the lowest level of combo glow. (Some older themes do not award a combo glow for this combo level; both the themes I offer here do.) Gold Combo If the combo counter is glowing gold, the player has received only Excellent and Fantastic judgements for the steps played so far (no judgments Great or worse). Finishing a song with a Gold Combo is called a "Full Excellent Combo," or "FEC" for short, and generally results in a grade of a Double or Triple Star. Getting a Great during a Gold Combo downgrades it to a Green Combo (or makes the counter stop glowing on some older ITG themes that do not award green combo glow). Blue Combo If the combo counter is glowing blue, the player has received only Fantastic judgments (and thus a perfect score) for the steps played so far. Finishing a song with a Blue Combo is called a "Full Fantastic Combo," or "FFC" for short, and receives a perfect score of 100% (a Quadruple Star grade). Getting an Excellent during a Blue Combo downgrades it to a Gold Combo. Dropping Holds/Rolls No matter what color your combo glow is, if you drop even one hold or roll, it will cause your combo glow to cease (though it won't reset the counter itself). |
USB Card Guide
1) Select a Card
If you don't have a card, and want one, you'll have to go buy one.
If you're only planning on saving your high scores and nickname, I'd get a 256 MB card. If you want to take tons of screenshots of your scores on the Results screen, you might want to go with a 512 MB card. If you're going to be playing custom songs, depending on how many, I'd go with anywhere from a 512 MB to a gig or two.
And in any event, remember that ITG isn't the only thing your USB card is good for; these things can store anything.
2) Uninstall U3 (If It's Present)
Some new USB cards still come with a program called "U3" installed, which allows the card to be more compatible with Windows. Unfortunately, ITG 2 machines run on Linux, not Windows, and furthermore, Linux has issues with U3 such that it will not read any card that has it installed.
So, long story short, check out your card before moving to the next step, and if it has U3 on it, uninstall it (just deleting the program folders won't work; you must uninstall it by running its uninstall program).
Essentially, you're already good to go at this point; you could go to the arcade and stick the card in the machine right now, and it'll save your scores just fine. But if you want to take care of everything before your USB card's initial arcade visit, read on.
3) Create Your Game Folders
If you don't prep your card and just stick it in the machine, it will actually do a lot of this for you, but if you want to display a nickname or count your calories, there are a few things the machine can't set up for you; read on.
1) Create the "In The Groove 2" Folder
Right in your main USB card directory, make a new folder and call it "In The Groove 2". The machine can do this for you.
2) Create the Subfolders
Go into your ITG 2 folder. Within that folder, create other folders called "Edits", "Songs", "Screenshots", and "LastGood" (a backup of your last good stats in case your card acts up). The machine will do this for you, as well.
4) Create Your Editable File
Make a new text document in your ITG 2 folder called "Editable.ini" (the extension must be .ini). Open it, and type in:
[Editable]
DisplayName=
LastUsedHighScoreName=
WeightPounds=
Your Display Name is your long nickname, which will display in the lower corner of the screen. It can be up to 12 characters long. You can use letters, numbers, spaces, symbols, whatever you want. The machine can't do this for you - you must do it yourself on a computer.
Your Last Used High Score Name is the initials you want your card to use for auto-filling your high score initials. This can be up to 4 characters long. You can only use letters and numbers here (unless you're interested in using a question mark or an exclamation point). If you don't stick anything in here, the machine will save whatever initials you put in on the machine (and if you didn't stick anything in your DisplayName field either, it will save your initials as your display name as well).
Your weight in pounds is only used for calculating the calories you burned after each set; the weight itself is never displayed. If you wish, you can set this at 0 or just leave it blank without affecting gameplay.
5) Put Custom Songs on the Card
If you've downloaded any custom songs (such as the ones from my pack), stick the song's folder in, where else, the "Songs" folder in the ITG 2 folder on your USB card.
More On Custom Songs
I can, of course, guarantee that the songs you find here will work fine (they all meet the criteria listed below). However, you can't just put any song you've been playing on StepMania on your card; unless someone told you directly that it's custom song ready, it might not be. (If you got it from GrooveStats.com, those have to be custom-song ready, and most authors who chart for arcade play like myself will usually point out on their BemaniStyle entires that a song is "R21-" or "ITG-Ready.")
There are 3 main issues people run into regarding songs that might not be custom song ready. Go into the song's folder, and take a look at the music file. These are the things you'll need to be concerned about:
1. Its file format. It must be an .ogg file (the ITG 2 machine will not read .mp3 files). If this is your only real problem, you can use a program such as Audacity Portable to convert the .mp3 into an .ogg file.
* Arcade machines that have OpenITG can have simfiles with .mp3 files hacked onto the machine, and they'll read, but from a card, it always has to be an .ogg file.
2. Its length. Songs cannot be 2 minutes (120 seconds) or over. However, this can be circumvented by applying the Ogg Length Patch. If the song is long enough that it would need patched, but you're unsure if it already is, apply the patch anyway - it won't hurt it. (I offer the Ogg Length Patch in the StepMania Stuff section for download.)
*Arcade machines that have OpenITG have an option in the Operator Menu where employees can set how long they'll allow custom songs to be, and anything over that can't be played regardless of the song's patch status.
3. Its file size. Even a length-patched song will not work on the machine if it's 5 MB or bigger. (With this restriction, without doing anything drastic to a music file, most patched files up to 4 minutes will work.)
* Arcade machines that have OpenITG have an option in the Operator Menu where employees can set the maximum filesize for the music file and stepchart (.sm) file individually; any songs that go over whatever is set cannot be played.
How to Create Your Own Simfile From Scratch
So you have a song, and you want to make your own stepcharts, but have no clue how to do it? Here is my step-by-step guide on how to create a simfile, start-to-finish, all the way from the creation of the empty song folder, to how to use the editor, to finalization steps (like deleting the .old files and recommendations on where and how to release your simfile if you want others to have it).
I am assuming that since you want to start from scratch, that you have an .mp3 that you want to use, and have absolutely nothing else. Every step will be explained in detail, and all possibilities will be included in case you have a video or a picture for the background and/or want to make a banner.
Just so you know: we won't be opening StepMania for a while yet; I'll let you know once you get that far into the process.
In the order I usually take care of things in:
1. Create the empty folder, and put your song in it.
This is always the first step to creating any simfile from nothing more than a music file.
1a. Create the song's folder. Create a new folder in any of your StepMania -> Songs category folders (I like to use a Works in Progress folder; StepMania CVS -> Songs -> Works in Progress -> New Folder), and name the folder with the name of the song.
1b. Convert your music file to an .ogg if necessary. If you're only planning on playing your simfile on StepMania, there is no absolute need to convert it if it's an .mp3, as StepMania and OpenITG cabinets read .mp3s just fine. However, there are several disadvantages to having your music file as an .mp3:
1) The indexing system for .mp3s is more inconvenient; this means that if you are editing a stepchart in the editor and choose to play from the current beat, it will take much longer to load (which means if you're like me, you'll lose your train of thought more easily).
2) If you plan on having anyone put the simfile on a USB card for use as a custom song, or are planning on adding it permanently to a non-OpenITG cabinet, the machine WILL NOT read .mp3s, and the file won't even display in most cases (and if it does, you won't be able to play it).
For this reason, I recommend using a program such as Audacity Portable to quickly and easily convert your .mp3 into an .ogg file; just drag the .mp3 into Audacity, let it load, then hit File -> Export as Ogg Vorbis. (If you want to make the song louder, by the way, you can permanently boost its volume by hitting Ctrl + A [to highlight the whole song] and hitting Effect -> Amplify; it'll ask you how many decibels of volume you'd like to add to the volume.)
1c. Put the song in the folder. After converting the song to an .ogg, stick it in the shiny new folder.
1d. Determine the BPM of your song beforehand if at all possible. You can always guess around once you open up the editor, but if you can possibly avoid that frustration (and trust me, it is a frustration), it pays off to figure it out before you ever start. My favorite tool for determining BPM is an online BPM tapping tool; open that, start playing your music file in something, and tap to the beat; the longer you do it, the more accurate the determination will be. (.ogg files will play in VLC in case you have nothing else that will do it).
2. Come up with the background elements.
|
Example: My background picture for "Stress-Free Style" from Volume 14 (The Definition of Fun).
|
2a. Put background picture(s) in the song's folder. Though a simfile will play fine without one, if you ever intend to release your simfile to the public and have half a brain in your head, you'll realize how useful it is to have a background (bg), because if your song doesn't have one, it will use the default fallback picture, and those who play on StepMania a lot already see the default fallback way too much, and appreciate seeing something other than that. It usually isn't difficult to do a Google Image search for an appropriate image. You can add the song or artist name to the bg if you like, but you don't have to. Along with a banner, a background adds to the song's feel and personality. You'll need to tell StepMania which picture you want to use as the song's default bg (in case you have more than one); more on how to do that in Step 5: Write the Basic Stepfile Info.
2b. If you have one you want to use, put a background video in the song's folder. As you know, some songs have music videos; if you have a video you want to use (regardless of whether it has sound or not, though videos with sound are bigger), you can stick it in the folder as well. You can easily download any videos you find on YouTube using the YouTube Downloader, and you can also convert it to an .avi (the filetype that causes the least lag). |
3. Create a banner.
|
Example: My banner for "Fly Away" from Volume 15 (A Gift from Ace with Love).
|
3. Craft a banner and place it in the song's folder. Even more than a background image, a banner is greatly appreciated by players; it displays more places than any of the song's other images, and some themes don't display the song's title on the results screen, meaning the banner is the only way to tell which song the screenshot is of. If your background image isn't too busy and you want to use it for a banner, you can always resize it.
The official standard size for quality banners nowadays is 418x164 (DDR size used to be 256x80). Banners should ALWAYS contain at least the name of the song, and should definitely contain the artist's name as well (I highly recommend it). A nice-looking banner is very important, as it could be a player's first impression of a song, even before they hear the music itself; not having a banner at all can be as much a turn-off for some players as having an ugly banner. There're lots of ways to resize images and add text to them; as for free programs, GIMP is an excellent choice for both resizing an image without losing quality and for adding text. If you have money (or torrent it), you can add flashy text to banners using PhotoShop as well. Personally, I use Microsoft Word's WordArt feature and copy the text over, but that's been my style for years, and is not the nicest-looking way to do things in most cases, though you can do so as well if you like it. |
4. Insert your CDTitle.
|
Example: My current CDTitle.
|
4. Copy your CDTitle into the song's folder. The CDTitle is the little icon that spins around in one of the upper corners of the song's banner on the music wheel. If you intend to become a regular stepartist, it's wise to make and use a CDTitle to put in all of your songs' folders to help identify the simfile as something you made. It must be a .png, and it should be pretty small (mine is 65x41). Again, a simfile will play fine without a CDTitle; you don't have to have one.
|
5. Write the basic stepfile info.
|
Example: For your reference, this is the basic stepfile info for Crow Song ~Duet~; here you see all the basic tags StepMania needs to start a song, and not all of them need filled out immediately; see the explanations on the right. After you have dabbled in the editor some, you'll note that the actual stepchart information appears below the taglist.
#Title:Crow Song;
#Subtitle:~Duet~; #Artist:Girls Dead Monster; #TitleTranslit:; #SubtitleTranslit:; #ArtistTranslit:; #Genre:J-Rock; #Credit:Ace Of Hearts; #Banner:Crow Song (Duet) - bn.png; #Background:Crow Song (Duet) - bg.png; #LyricsPath:; #CDTitle:Ace Of Hearts.png; #Music:Crow Song (Duet).ogg; #Offset:0.726; #SampleStart:43.300; #SampleLength:12.000; #Selectable:Yes; #BPMs:0.000=174.000,446.000=87.000,462.000=174.000; #Stops:; #BGChanges:; #KeySounds:; |
5. Create the .sm stepfile for your song. There needs to be a stepfile with basic info in it for StepMania to read before you can go sticking arrows into it. Create an ordinary text (.txt) file in the song's folder, and rename it to have a .sm extension. This is very important; StepMania can't and won't read .txt files. You then need to feed it some basic information about your song.
5b. Fill out the basic tagform. All stepfiles open with the taglist, an example of which you can see on the left. Here's the explanation for each, including what you do (and don't) need to fill out right this second. All tags must start with the pound (#) sign; the contents go between the colon and the semicolon (which basically says "this is the end of the tag"). There's nothing to type above the #Title tag; just open the file up and start with #Title at the top. Title: The main title of your song, which you should tell it. Subtitle: If your song has a subtitle (such as a mix name), this is where you stick it. Artist: The artist's name. Transliteration Tags: StepMania can automatically transliterate titles and artists, and does so automatically; you should not need to place anything here yourself at this time, as, if SM auto-translits something for you, it will automatically change the main and translit entries for you. Genre: The music wheel offers the ability to sort by genre; if you give it a genre to reference, it will be listed under that genre if the player sorts that way. Banner: You need to tell StepMania the name of the image file you're using as the banner. If you don't have one, leave it blank. (If you forget to tell it, it tries to guess; first, it looks for an image with "bn" or "banner" in its name, and if forced to second-guess, it tries to shoot for the appropriate-sized image.) Background: You need to tell StepMania the name of the image file you want it to use as the default background image. If you don't have one, leave it blank. (If you forget to tell it, it tries to guess; first, it looks for an image with "bg" or "background" in its name, and if forced to second-guess, it tries to shoot for the appropriate-sized image.) LyricsPath: StepMania is compatible with and will display lyric (.lrc) files. If you have created one, tell it the name of the file. CDTitle: Tell it the name of your CDTitle, if you have one; if not, leave it blank. Music: Tell it the name of the music file. Offset: You will likely be doing trial-and-error to discover your song's offset in the editor; set this at 0.000 to start. SampleStart: The point in the song where the sample starts playing on the music wheel when you highlight the song, in seconds. You can figure this out ahead of time and tell it, or just set it to a random point and figure it out in the editor later. SampleLength: How long the sample will keep playing until fading out and starting over, in seconds. The standard is 12 seconds, but can be set as long or as short as you want. Selectable: Tells StepMania whether or not it is allowed to display the song as playable on the music wheel. Just tell it Yes to avoid hassle. BPMs: Tells StepMania the BPM of the song. The format is [position in song in beats]=[BPM at that beat]. The only one you need to tell it immediately is the song's starting BPM (at beat zero, 0.000=starting BPM); StepMania will fill out any slowdowns/speedups for you as you add them in the editor. If you determined it using a tapping tool, tell it what the BPM is. If you don't know and actually want to guess at it in the editor, the default is 60 BPM, though most songs are at least 120. Stops: Tempo stops in the song. The format is [position in song in beats]=[amount of time stopped in seconds]. You don't need to put anything here now, as StepMania will automatically fill this out for you when/if you decide to add any stops in the editor. BGChanges: If the background changes, you'll see details here. You don't need to fill this out, as StepMania will do it for you as you add background changes using the editor. KeySounds: StepMania 3.95 is apparently compatible with keysounds; if you play Pop'n Music or Osu, then you know exactly what this means. However, arrow games don't usually use them (I've never seen a simfile with any, anyway, and I've played TONS of files), so leave this blank. |
6. Open your song in the editor.
At this point, you should have in your song's folder:
1) its .ogg music file
2) an .sm stepfile
also hopefully:
3) one or more background picture(s)
4) a banner
and possibly even:
5) a video
6) a CDTitle
6a. Open StepMania. Time to actually get started!
6b. Find your song in the editor menu. Hit "Edit" (or whatever your theme calls the song editing menu), and find your song in the category you stuck it in.
6c. Highlight a difficulty level to work on. It's your choice which difficulty level(s) you want to write, and which one you want to start with; choose one, then scroll down and hit "Create New." Your song will open up in the editor.
7. Determine your song's synchronization.
7a. Determining your offset. Your offset is one-half of proper synchronization (the other is the correct BPM). The solid measure lines are the beat; if the beat of the song is not falling directly where it should, you can adjust your offset by hitting F11 (earlier) or F12 (later). To listen to the song, hit [Esc] to get the menu (for more on how menu functions work, see Step 8: Write the Stepchart) and pick either "Play Whole Song" or "Play Current Beat to End." You can help yourself determine your offset by placing a few 1/4 note arrows (see Step 8: Write the Stepchart for details on how to place arrows) and turning on both AutoPlay (F8 during playback) and the Assist Tick (F4).
Note About Offsets Regarding Videos: If you have a video, ALWAYS make your offset POSITIVE. The reason is, if you push the start of the song further into the chart's timeline, there's plenty of room to stick in the cue for starting the video. However, if you pull the beginning of the chart up too far, it will become impossible to place the cue for the video where it will need to go.
Why? Will it skip my empty chartspace?: StepMania checks everything before starting a song in formal play. When you pick to play a song in-game, StepMania will start the song at the earliest possible convenience to make sure everything displays, but will make sure it does cut off empty chartspace if there is absolutely no good reason for it to play through it. In my experience, this is how it works:
* If you have a video, it will skip any empty stepchart space up to where the video cue is, and start play there. (It will not skip to where the stepchart starts.)
* If there is no video, it will check against these two variables and start 1 measure before whichever comes first:
-> When the music track starts. (It prefers it this way unless you undermine it using the method below.)
-> Wherever you placed your first element (only gets checked if for some reason you placed arrows or mines before the beginning of the music track).
* Just a side note: Your song will end in formal gameplay 1 full measure after the last chart element (note, hold tail, roll tail, or mine) on the official difficulty where you have your latest ending. (It will also actually cut off Edit difficulty charts at that point.) It will ignore any remaining music left in the track at that point and advance to the Evaluation screen.
7b. Determining your BPM. I would hope you used a tapping tool (like the one I provided above) to determine your BPM ahead of time, because guessing at the exact BPM of a song is, in this stepartist's opinion, the most frustrating thing one can possibly try to do while writing a file - and that's how you have to guess: while trying to write the charts; you'll continually have to keep going back up to beat zero to make adjustments to the starting BPM until it is correct (which is why I say to USE THE BPM TAPPING TOOL - to avoid this frustration!!). Even with a tap tool, though, some songs have a weird BPM, so though in most cases BPMs are exact numbers (like 124.000), sometimes you'll get a weird one (like 138.26) that you will have to do (significantly less) guessing for - at least a tap tool will put you somewhere really close to the right number to cut down on guesswork time. To adjust the starting BPM, go up to beat zero, and hit F7 for slower, F8 for faster, or hit [Esc] to get the menu and hit "Change BPM at Current Beat" to type one in yourself.
8. Write the stepchart(s).
8. Write your stepchart(s). Here's how everything works.
Normal stepchart writing goes like this:
1) Place some arrows where you think they go (I usually like to do one measures' worth at a time).
2) Go back up a few beats, go to the menu, and hit "Play Current Beat to End" to double-check that you placed them correctly (I usually like to use the Assist Tick unless I'm trying to follow an instrument that's hard to hear with it on; also, I highly recommend turning on AutoPlay so you have a source of perfect precision timing you can really count on).
3) If it checks out, move on and chart the next few beats; if not, make corrections and check again.
Lather, rinse, repeat, until you hit the end of the song. This is how I have charted since I started, and though there are technically several ways to do it, this is my preferred method.
8a. Basic Navigation & Arrow Placement:
Navigation & Snap
Up/Down: Move up/down the stepchart's timeline. [Pg Up]/[Pg Dn] to scroll entire measures, [Home]/[End] to go directly to the beginning/end of the chart.
Left/Right: Change your note denomination snap (to place more or less specific note denominations).
[Ctrl]+Up/Down: Expands/collapses the timeline so you can read your placed notes better.
Placing/Removing Arrows
Basic Placement/Removal: [1], [2], [3], [4] Keys: Press [1], [2], [3], or [4] to place an arrow (left, down, up, and right, respectively) at the current location. You can also remove an arrow by going to its location on the timeline and pressing the same number again.
Tap Arrows: Just press [1]/[2]/[3]/[4].
Holds: Press a number, then drag as far down as you want in the timeline; you can create a Hold of any length.
Mines: Hold [Shift] and hit [1]/[2]/[3]/[4] to place a Mine on that arrow.
Rolls: Hold [Shift], hit [1]/[2]/[3]/[4], and drag down; the Mine will turn into a Roll of your desired length.
You can also hit [Ctrl] + [R] to Record, which allows you to place arrows in this manner while the song is playing; I really don't recommend this unless you both A) know the song really well and B) have the note denomination snapped to the exact denomination you need.
8b. Shortcuts You'll Actually Use
There are tons, but here are the ones you'll actually use a lot. You'll find these on the F1 Help Screen:
F4: Assist Tick On/Off
F8 During Playback: AutoPlay On/Off
[Shift]+[P]: Play Current Beat to End
F7/F8: Decrease/Increase BPM at Current Beat
F9/F10: Decrease/Increase Tempo Stop at Current Beat
F11/F12: Decrease/Increase Offset
[B]: Add/Edit a Background Change (You can add videos this way.)
[M]: Play Sample Music
[ and ]: Decrease/Increase Sample Start Point
{ and }: Decrease/Increase Length of Sample
[Insert]/[Delete]: Insert an empty beat and shift all arrows down/delete a beat.
[Ctrl] + [Insert]/[Delete]: Move only BPM changes/stops up/down one beat.
8c. The Edit Menu
Press [Esc] to get to the main Edit Menu, which has a bunch of helpful options you can set:
Edit Steps Information. Pick this, and you can tell it how many feet you want to rate the difficulty, and give that difficulty level a name if you want.
Play Whole Song. Rewinds back to the start of the chart and plays the whole thing from the top.
Play Current Beat to End. Starts playing from the current beat.
Save. Saves your stepchart. Like in an RPG, do this early and often.
Revert to Last Save. If you figure you've done something particularly unsavory to your chart since the last time you saved, you can pick this to go back to the last time you saved.
Revert from Disk. If you're someone who likes to dabble in the actual .sm file while you edit (I usually don't, though sometimes unforseen circumstances can call for it), you can pick this to basically force the editor to reload the .sm file.
Playback Modifiers. Takes you to the Mod Menu, so you can set the modifiers you want to use when you play the song in the editor.
Playback Options. There're a few reasonably useful options in here; most usefully, you'll find the Music Rate option (in case you need to slow down the actual playback speed - useful for double-checking really fast songs), Auto-Adjust (in case you want to try to automatically determine an offset), and the Assist Tick (though you can also turn the Assist Tick on and off by pressing F4).
Edit Song Info. You can edit the title, artist, and other similar info here. Please note that this option does not work in In The Groove-based themes; the menu elements won't display correctly (it works fine for the default theme). You shouldn't need it anyway, as you should have already told it all this stuff in the .sm file.
Edit BPM Change. Lets you change the BPM at the current beat. You can use this to add slowdowns/speedups.
Edit Stop. Lets you add/alter a tempo stop at the current beat.
Add/Edit Background Change. This allows you to add a background change cue at the current beat, which allows you to change the background to a different picture or a video. Please note that this option does not work in In The Groove-based themes and will crash the game; fear not, though: ITG theme users can still alter background changes - they just can't do it through the menu: hit [B] and you'll get to the background change menu just fine.
Play Preview Music. Plays the sample, so you can determine if you'd like to change its starting point or length. The bracket keys [ and ] change the starting point; hold [Shift] and hit them to change the length.
Preferences. Only one, actually: Whether or not to display the background/video during playback. Only enable this if you're trying to determine where to put a video, or if you only have a picture as the background.
Exit. Exit out of the song, back to the edit mode menu. You'll be asked if you want to save before quitting.
8d. The Area Menu
Hit [Enter] to go to the Area Menu, which more or less obviously has options that apply to a highlighted area of the stepchart. (To highlight an area, either hit the [Spacebar] once at the beginning and once at the end of an area - which will be highlighted in red - or hold [Shift] and scroll up or down as far as you want.)
Cut. Removes the arrows from the chart, but adds them to the clipboard.
Copy. Copies the arrows to the clipboard; doesn't remove them from the chart.
Paste at Current Beat. Pastes the current contents of the clipboard at the current position.
Paste at Begin Marker. If you've still got an area highlighted and don't want to be bothered to scroll to the top, use this option to stick them at the beginning of the area you have highlighted.
Clear Area. Hate your selection? Pick this and the arrows are gone, no questions asked.
Quantize -> You can quantize all notes in your selection to use a new denomination as their maximum.
Turn -> If you add or subtract arrows in the middle of a chart, you can highlight the rest of your chart and have its orientation flipped any way you like, or you can flip a copied pattern.
Transform -> Can transform your selection in various ways.
Alter -> Alters things.
Tempo -> Useful for telling a normal-speed section that you want it to become a slowdown, or transforming it in other similar ways.
Play Selection. You can highlight a section of a completed chart, and play only the selected area.
Record in Selection. Add notes live in your selection as it plays.
Insert Beat and Shift Down. Adds one beat of empty space at the current beat. [Insert] also does this.
Delete Beat and Shift Up. Deletes one beat at the current beat. [Delete] also does this.
Shift Pauses & BPM Changes Up. Useful if you already used Insert or Delete; this shifts ONLY BPM changes and pauses below your current position up one beat - it does NOT move any arrows.
Shift Pauses & BPM Changes Down. Same as above, except it moves them down a beat.
Convert Beats to Pause. Useful for creating tempo stops; changes the entirety of your highlighted area into one tempo stop.
Convert Pause to Beats. Don't like a stop you created? This'll change it back.
9. Finalization
So you have completed stepcharts, and want to finalize or even release the simfile? Here's what you can do.
9a. Move the song folder to its proper category if it was in a WIP folder. If you use a Works in Progress folder like I do, your file is done, which means it is no longer a work in progress; move it to its proper category folder.
9b. Delete the DWI and .old files. If you plan to release the simfile to the public, you can tidy up by going into the song's folder and deleting its backup saves:
1) The song's .dwi (Dance With Intensity) file.
2) The .dwi.old file.
3) The .sm.old file.
This leaves only the actual, current .sm file as the only stepfile in the folder.
9c. Write a lyric file. If you know or can obtain the lyrics to the song, and are willing to tolerate having to tell the file when to display lyrics, you can write a lyric file for your sim. (See one of my own .lrc files for an example on the format for a lyric file; it's not hard to write one, it's just very time-consuming.)
10. Release
Want to make your simfile available to others? Here's how:
10a. Zip your simfile. Right-click the song's folder, and tell it you wanna zip it up.
10b. Upload your simfile somewhere. Traditional sites include BemaniStyle (though you have to sign up for a free account) and MediaFire; fill out any necessary information your site of choice asks for.
10c. Post on your website, or another favorite site or blog, that you have released a simfile. People won't go get it if they don't know it's there - tell them about it!
